
THE DOCK
The Dock is the bar of icons that sits at the bottom (by default) or side of your screen. It allows you to quickly access frequently used programs (apps/software) and files or folders.
The items in the dock only require a single click to open. So if you want to access your Email you click on the postage stamp icon. For Photos you click on the rainbow flower, music notes for iTunes, etc.

You can see what applications are open and running by looking for a small black dot below the applications icon in the dock. If you press and hold on the application's icon you will get a pop up menu such as the one below (L) from Safari. This popup will show you what windows are open for that single application, it will also allow you to quit the application and depending on the application you may see other choices. If you click on the word "Options" will see another pop out (R) and you will be able to tell an application to "keep in dock" by clicking on the words. Note: you can also tell the application to open when you turn on the computer from here.


Customizing Your Dock
The Dock keeps application icons on the left side. Folders, documents, and minimized windows are kept on the right side of the Dock. If you look closely, you can see a vertical separator line that separates these two sides. You can customize how the icons in the dock are arranged by just dragging an icon to another location The Trash and the Finder are fixed icons that cannot be moved - they will always present at each end of the Dock.

You can customize how the Dock behaves and where it lives by going to the Apple Menu > System Preferences > Dock. OR by holding the Control Key down while clicking on the separator line on the right most side of the Dock.

Adding and Removing Dock Items
The Left Side of the Dock
If you want to add an application to the Dock, click the Launchpad (rocket ship) icon in the Dock or go to your Applications folder. Then, drag an app icon from the Launchpad or folder to the Dock. The icons in the Dock move aside to make room for the new item.
The Right Side of Your Dock
This is where you can put frequently used files or folders or where minimized application windows land. You put an icon for a file or folder on the Dock by dragging it directly to the right side - the Dock will "open" a space for you. NOTE: When you add a folder or file to the Dock, it is only a link to the original item. If you move the original, the link will be broken and if you remove an icon from the Dock, the original stays put.

To remove an item from the Dock, drag its icon several inches or more off the Dock and wait a couple seconds - you will see the word "remove" appear. Then release the icon and it disappears. When you remove an item from the Dock it doesn't permanently remove it from your computer. If you want that item back in the Dock, locate the app, file, or folder in the Finder or Launchpad, and simply drag it back into the Dock.
Minimizing Windows
If you minimize a window (click the round, yellow button in the upper-left corner of any window), the window slides down into the Dock. It stays there until you click its icon to bring up the window again.
Folders in the Dock
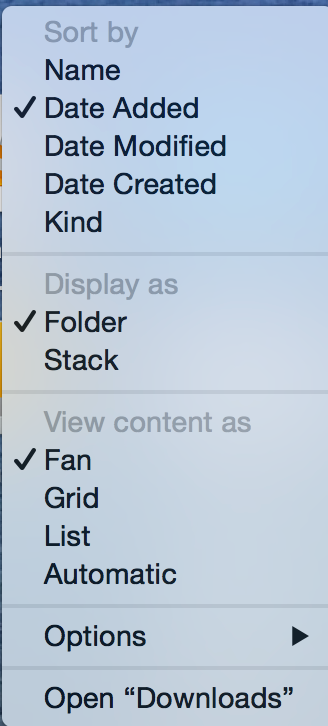
By default on a new computer, the Dock contains an icon for both your Downloads and Documents folder - to change the way these folders (or any you add) appear and behave, hold the Control key and click (or right click) on the icon in your Dock for downloads and you will see a popup menu like this.You can easily change the sort option to your preferred method of sorting items. You can also change how the icon appears (I prefer folders) when you click on it. You can also choose how to display folders in the Dock. You can either view them as a folder icon, or as a stack. Stacks display a folder's contents as a fan or grid when you click them in the Dock.
The Trash
The right most icon on your Dock is the Trash (its icon looks like a waste basket). Drag any documents, folders or items you no longer want to the Trash remove them.


When you move something to the Trash, you still haven't completely deleted it. You can click the Trash icon in the Dock to see what it contains. When you're ready to permanently delete files or folders that you've dragged to the Trash, click and hold the Trash icon in the Dock and choose Empty Trash.
If you drag a disk or other mounted volume to the Trash, it changes to an eject icon to let you know that this action ejects or removes the item rather than erasing or deleting it.
Calendar Tip - handling 'tentative events'
If you really want to transition to a digital calendar but are having trouble figuring out how to handle 'tentative events', this is a great idea from reader Dick G.

"Often, particularly for "distant future dates", an activity is only semi-confirmed initially and I am holding a specific date pending further confirmation of details.
I find it helpful to preface the name of the activity with a "?" symbol to remind me it is a tentative date. I use up to three "?" to define how tentative the event is on the schedule.
As details are confirmed, I remove or reduce the "?"'s preceding the calendared event. It helps to separate "soft plans" from "hard plans." It is analogous to "penciling in" an event on a paper calendar."
Thanks Dick for another great tip!!